Connecting an ASUS/Merlin router to AWS Route 53 for DDNS
I have an ASUS router in my home. I’ve installed a custom version of the firmware known as Asuswrt-Merlin on my router created by a person called Merlin. I give many props to Merlin for the effort.
I have turned on a VPN on my router, so that I can securely access computers in my home from the internet. But my home connection to the internet, like most home connections to the internet, is not using a static IP. ISPs like to charge extra for that. If I do not have a static IP address I need a way to determine what the current IP address is at my home. Routers have a method for dealing with this called DDNS or Dynamic DNS. Without going into an incredible amount of detail. DDNS resolves the problem that occurs when my ISP changes the IP address of my home connection to the internet by publishing each change to a DNS record on a domain that I own.
Asuswrt-Merlin firmware is really a miniature version of Linux. So I am able to actually write scripts that run on my router. Merlin has made it really easy to customize a DDNS solution by making the router look for a script called ddns-start, and if it exists the router will call it every time the IP address at the house changes.
Given that I recently moved my domain to Route 53 on AWS and that I wanted to learn a little about AWS, I decided to write my own AWS DDNS solution.
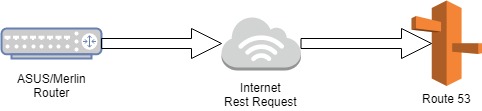
There are two ways to go about this. One would be to directly call Route 53 using the REST API.
But what would be the fun in that. I decided to use the API Gateway to launch Lambda to allow a few other actions.

So now I lookup the old value of the DDNS IP address against Route 53. If there is a change I do the following:
- Make the change in Route 53
- Put metric data into CloudWatch
- Send a message to SNS so that I am notified of the change
I’ll get into the Lambda function in another post, with this post I will focus on the DDNS script. The difficulty in the script is sending a signed REST request using a minimal version of Linux. Sending that request directly to Route 53 or to API Gateway is more or less the same. Although the payload of the API Gateway request is easier since it is only the new IP address and I am using a query string for that, so no payload.
But as I said, the REST request must be signed. That took more than a few Google searches to figure out. And more importantly it has to be precise. I will describe the process briefly here, but the details are in the code. First, we are sending a few things in the request.
- A canonical request
- A number of data values
- Short Date – yyyymmdd
- AWS Region
- API Gateway service – execute-api
- Type of Request – aws4_request
- An access key
- Long Date – yyyymmddThhMMssZ
- Instructions on how to build the signature
- Signature
The signature takes most of the data sent plus a secret key and through a series of steps a hash value is created. Note, the secret key is not sent, it is only used to “encrypt” the hash value. When AWS receives the request. it uses the access key to lookup the saved copy of the secret key plus the data values and the signature instructions to build it’s own signature. AWS will only accept the REST request if the signatures match and the long date is less than 15 minutes old.
Here is the code
#!/bin/sh

# get the new IP address
IP=$1

# format and gather all of the data required
# you will need your own values for HOST, URI, ACCESSKEY, SECRETKEY and REGION
SDATE=$(date -u +"%Y%m%d")
LDATE=$(date -u +"%Y%m%dT%H%M%SZ")
HOST=IAMTHEAPIGATEWAYHOST
URI=/v100/ddns/
QUERY=ip=${IP}
ACCESSKEY=IAMTHEAWSACCESSKEY
SECRETKEY=IAMTHEAWSSECRETKEY
REGION=us-east-1
SERVICE=execute-api

# hash functions to wrap openssl call
hash () {
 /bin/echo -e -n "$1" | /usr/sbin/openssl dgst -sha256 -hex | /bin/sed 's/^.* //'
}

keyhash () {
 /bin/echo -e -n "$1" | /usr/sbin/openssl dgst -sha256 -hex -mac HMAC -macopt "key:AWS4${SECRETKEY}" | /bin/sed 's/^.* //'
}

rehash () {
 /bin/echo -e -n "$2" | /usr/sbin/openssl dgst -sha256 -hex -mac HMAC -macopt "hexkey:$1" | /bin/sed 's/^.* //'
}

# hash the empty payload (the hash value is not empty)
payloadHash=$(hash "")

# build the canonical request
canonicalRequest="GET\n${URI}\n${QUERY}\nhost:${HOST}\nx-amz-date:${LDATE}\n\nhost;x-amz-date\n${payloadHash}"

# hash the canonical request
canonicalRequestHash=$(hash "${canonicalRequest}")

# build the string to sign
stringToSign="AWS4-HMAC-SHA256\n${LDATE}\n${SDATE}/${REGION}/${SERVICE}/aws4_request\n${canonicalRequestHash}"

# build the signing key
kDate=$(keyhash "${SDATE}")
kRegion=$(rehash "${kDate}" "${REGION}")
kService=$(rehash "${kRegion}" "${SERVICE}")
kSigning=$(rehash "${kService}" "aws4_request")

# use the signing key to sign the string to sign
signature=$(rehash "${kSigning}" "${stringToSign}")

# Use curl to send the signed request
curl -s -X GET \
 -H "Host:${HOST}" \
 -H "X-Amz-Date:${LDATE}" \
 -H "Authorization:AWS4-HMAC-SHA256 Credential=${ACCESSKEY}/${SDATE}/${REGION}/${SERVICE}/aws4_request, SignedHeaders=host;x-amz-date, Signature=${signature}" \
 https://${HOST}${URI}?${QUERY}

# call the ASUS/Merlin script to signal that the DDNS event has been successfully handled (I recommend checking the return value of the curl command above)
/sbin/ddns_custom_updated 1